CS1260 Environment Setup Guide
Welcome to CS1260: Compilers and Program Analysis! Please follow this guide to set up your development environments. You’ll have to follow the steps listed here for each assignment, but it’s pretty streamlined.
We recommend developing remotely, as this has the easiest setup. Feel free to come to office hours if you’re having trouble, but please check out the FAQ section first.
Remote Development
Working with Github Codespace in your browser
This method of developing for this class will involve the least amount of setup on your end!
We strongly recommend signing up for free student benefits through GitHub Education, which will give you extra Codespaces hours per month.
1. Create a codespace inside your repository:
Click the green <>Code button, as you would to clone your repository. Instead of copying the URL, select Codespaces, then click Create Codespace on Main. Your codespace will automatically launch in the browser. It might take a few minutes for the container to build.
2. Using a codespace:
Click the <>Code button and go to the Codespaces tab, you should see the codespaces you’ve created with the current repository. You can launch a codespace in your browser or in VSCode Desktop
Working with GitHub Codespace in VSCode
-
Install the GitHub Codespace plugin.
-
In the command palette (
CMD+SHIFT+Pon Mac,CTRL+SHIFT+Pon Windows), search forCodespaces: Create New Codespace…(if you haven’t done so on GitHub following the steps in the previous section) orCodespaces: Connect to Codespace…, then choose the repository you want to work with. VSCode might ask you to sign in to your GitHub account and give out some authorization.
Managing your Codespaces
We recommend committing and pushing your work regularly to your GitHub Classrooms repository. This way TAs can easily look at your code if you have questions, and in the result of Codespaces outages, nothing will be inaccessible.
When you complete an assignment, we recommend pushing your work and deleting the codespace. GitHub allows a limited amount of Codespaces storage per user and having a lot of assignments adds up!
Local Development
(We highly recommend developing remotely, especially if you don’t already have docker on your local machine. The local Docker image will not work unless you're using an x86-64 machine. In particular, it will not work on Apple silicon.)
-
Make sure you have a docker engine and VSCode Dev Container plugin installed.
-
Start the docker engine, then open VSCode and search for
Dev Containers: Open Folder in Container…in the command palette. Choose the assignment folder (it should contain a.devcontainerfolder), and VSCode will do the rest of the setup for you.
If you see this at the bottom-left corner, you should be good to go:

> FYI: Docker setup
Mac:
Follow the instructions to install Docker Desktop.
Windows:
Make sure you have the wsl environment set up. Then, follow the instructions to install Docker Desktop.
Frequently Asked Questions
1. dune: ‘command not found’
Run eval $(opam env) inside your working directory. You may have to run this command again whenever you relaunch your codespace/devcontainer or switch into a new directory.
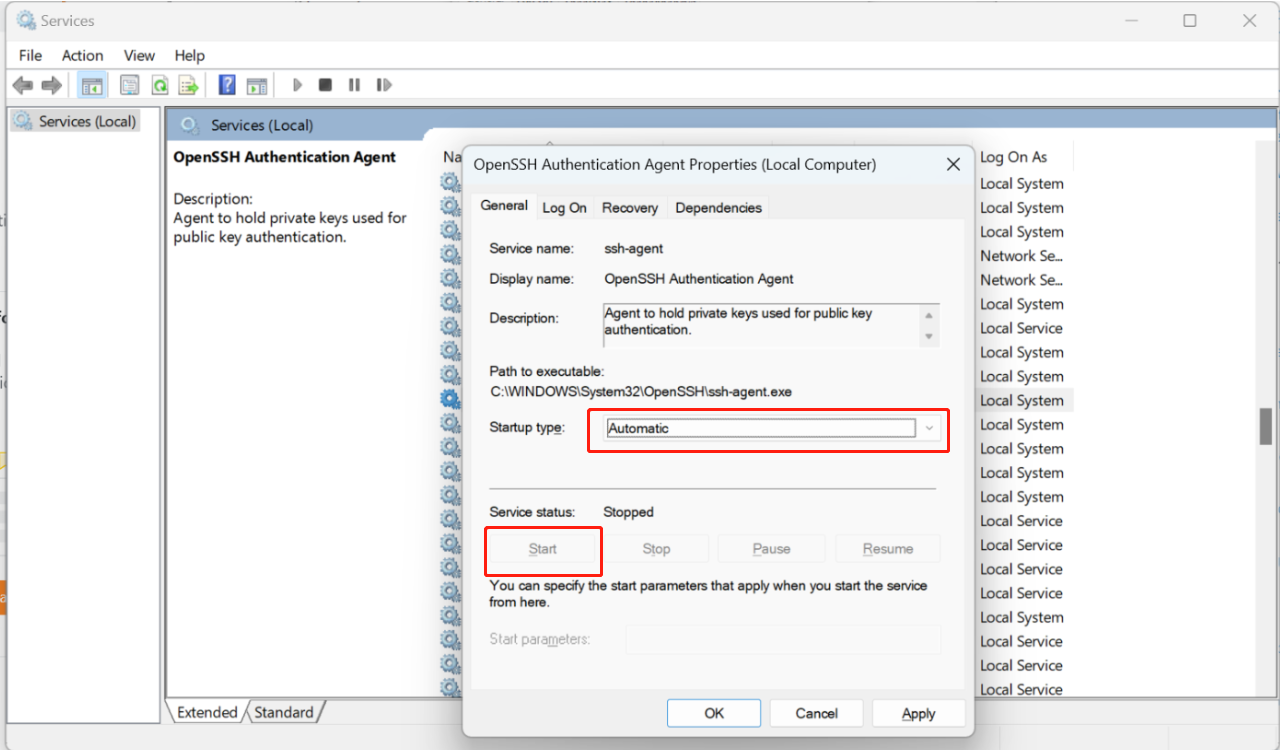
2. Windows: Git is not working, and VSCode prompted ‘could not connect to ssh-agent’
Run (Win + R) services.msc, or just search for services. In the pop-up window, scroll down to “OpenSSH Authentication Agent Properties”, set startup type to Automatic, and click Start if the service status is Stopped:
